The influx of tools and techniques to optimize and improve agentic systems is becoming overwhelming. We have something new coming out every few days which promises to solve all our problems. It’s hard to keep up with it all.
We have spent the last few months reading everything that seems effective in theory and tried it in practice. However, covering all of the methods in one post is not possible, thus this blog specifically covers everything around context engineering.
Harness

The harness is the operating system of the agent. We know that an agent is just a loop of LLM and tools, similarly, how the tools are provided, how the context is managed, how the compaction is done, etc. are the jobs of the harness.
ChatGPT is a chat interface harness, not ideal for long running coding workflows, however, before we had Claude Code and Opencode almost all of us had accepted that copy pasting code from the editor to the input box was the ideal or the best way.
Different harnesses have different tools, different system prompts, different ways to manage the context, etc.
The model is as good as the harness, this is why models running inside droid can reach higher scores on benchmarks vs. others.
There are many things we don’t know that agents can do, simply because there is no ideal harness for it.
All the techniques we use for making our agents better are essentially techniques of harness engineering. Now, with that out of the way, we will proceed to the understanding and techniques of actually doing harness engineering. This post is all about context.
Context
The context is short term, volatile memory like RAM for the agent. The identity of the agent, the tool definitions, the tool calls made by the agent and their outputs, etc. all live in the context.
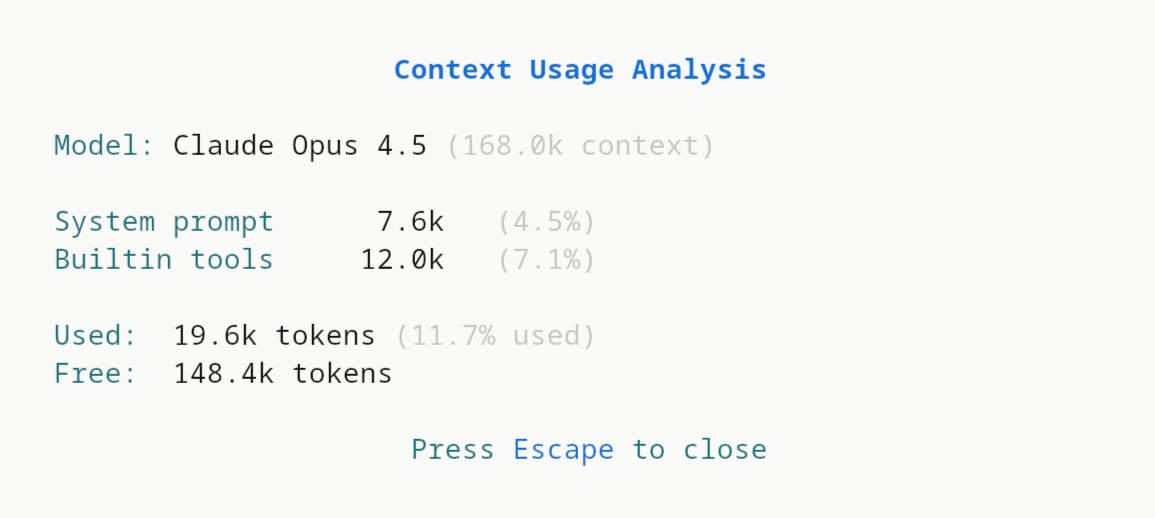
As the context fills, the abilities of the model deteriorates. Some models like Gemini 3 flash/pro have a context window of 1 million tokens, which sounds huge in theory and definitely is compared to any other model in the market, however, in practice most models are good only until ~60-70% of their context is filled.
This is, in the most strict sense a limited resource. Every new tool added, every new MCP server added, every new instruction added fills up the context. Chroma Research called this context rot.
Thus, the best way to preserve agent performance is to guarantee that the model’s context contains the least amount of useless tokens.
While techniques such as compaction (discussed later) do help, they are no silver bullet. Compaction could be the death of your agent if not done properly.
Context Engineering
Context engineering is all about minimizing the bloat in the context window of the model so it can do it’s best. There are very clever ways to do this. Let us discuss them one by one.
1. Tool Reduction
If your agent has both a Bash tool and a python_package_install tool, which one will the agent use when it has to install a Python package?
These types of scenarios confuse the model. This is a simple example, but you can think how the same applies to reading files, or deleting files, etc.
This confusion can lead the agent to waste effort thinking (gpt-5.2-xhigh we’re looking at you), which is not what we want, as it all fills up the context window.
You always have to ask yourself when adding a new tool whose job can by done by an existing tool:
Can we make the agent do the same task using an existing tool without overloading the context with new instructions?
The answer to this is up to you to decide.
1A. Tool minimization
If you’re providing the agent with custom tools that you yourself have written, or have full control over - you can analyze the trace of the agent to remove the parameters or instructions which the agent seems to not use.
For example, if your Bash tool has a cwd parameter but the agent seems to just use cd or full paths to do it’s operations, then you can consider removing it.
This can in practice, reduce the bloat from the tool definitions. Remember, every token counts.
1B. Batching
Another thing you can do by analyzing traces is finding out if the agent does something in multiple steps which can be done in one step.
For example, we found out that our agent was using one tool to first find the definition of a function, which returned it the line number and another one to actually get the definition’s code. We optimized this simply by adding a include_source parameter in the tool.
Now the agent can do both things with one tool call. The definition of the other tool is no longer needed.
1C. Scripting
If there are a bunch of things, which can’t be batched as one tool because of the complexity of operations - you can always write scripts in Bash or Python which do those things and then put them in a scripts/ folder and give the agent access to them.
These scripts now become new tools for the agent that it can discover simply by doing ls inside the scripts directory.
Of course, some amount of custom system instructions is needed for this, but it can be very high ROI.
2. MCP
MCP tools are great, however as soon as you connect to one you load all the definitions of every tool defined to your context.
This is the same problem as we discussed earlier when talking about tools but it is scaled up because MCP tools are written by someone else or hosted somewhere else.
This is bad because unless you manipulate the underlying framework (e.g. langchain) which you use to connect, there are very few things you can do.
There are a few solutions to this. Some MCP providers, e.g. Exa allow you to specify which tools you want through a get parameter.

If you are developing an MCP server, you MUST do this.
This is, however, not reliable because tons of MCP servers don’t have this. So, what do we do?
2A. Code Mode
According to this article by Cloudflare research, converting the MCP tools into a TypeScript API, and then asking an LLM to write code that calls that API.

This can be very helpful, because now you and the agent have more control over the available tools. Now, you can more easily modify them as your agent needs, if this is something you can do.
2B. CLI Mode
The other variant of code mode is when you convert MCP server into a CLI tool. We call this CLI mode. We discovered this by reading this Manus’ blog post.
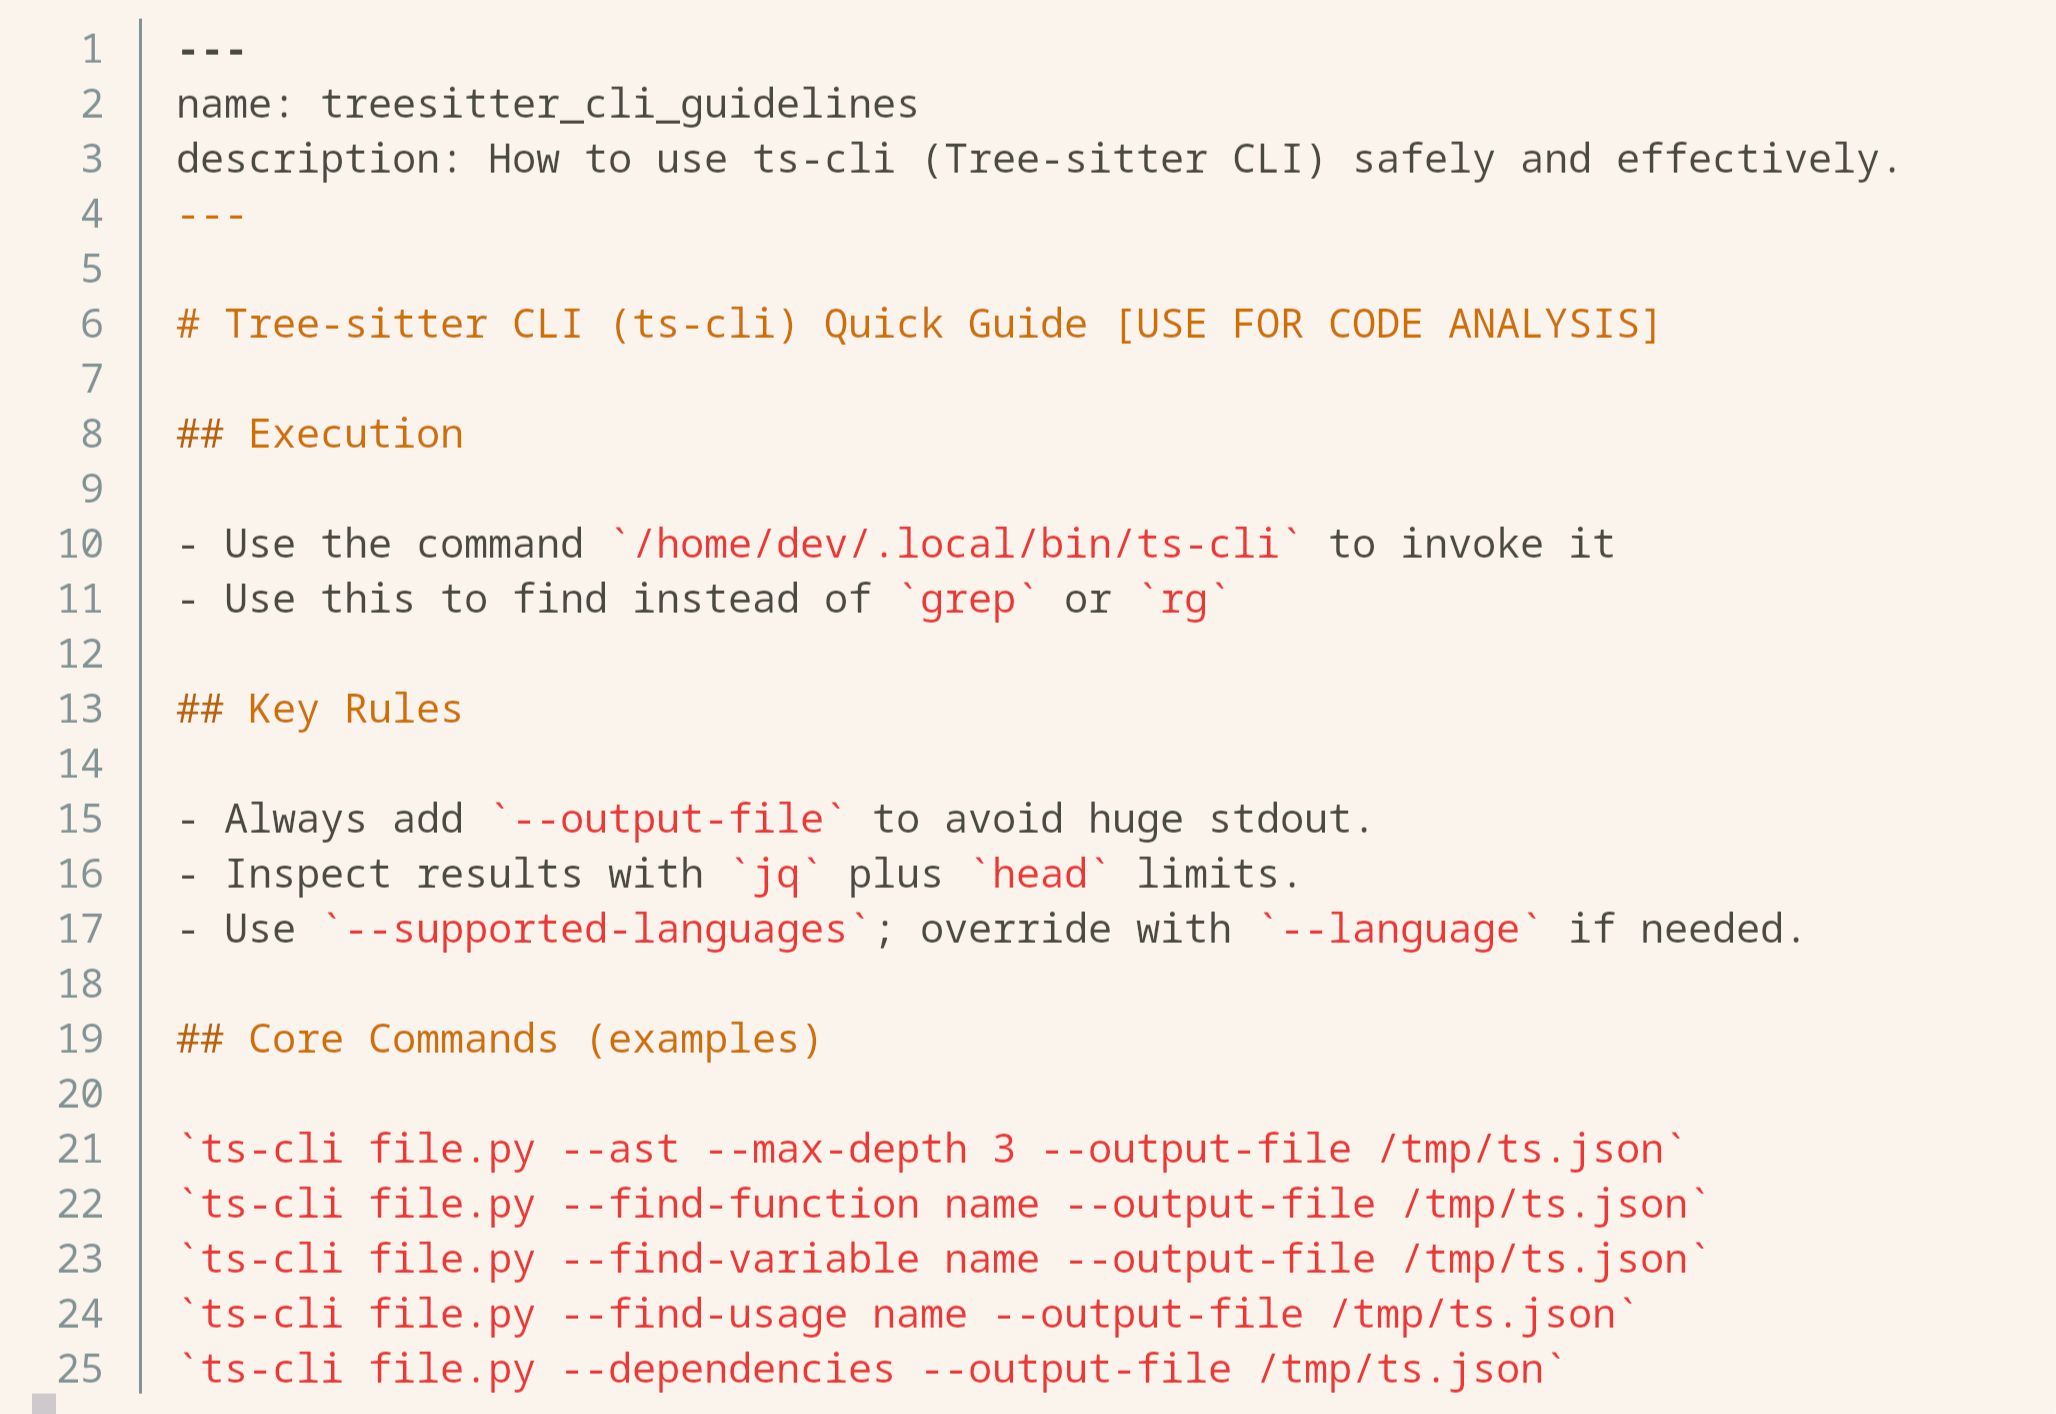
We have personally done this for the treesitter-mcp server that we wrote by creating a tool ts-cli which the agent uses as needed! No preloading instruction, no bloat!
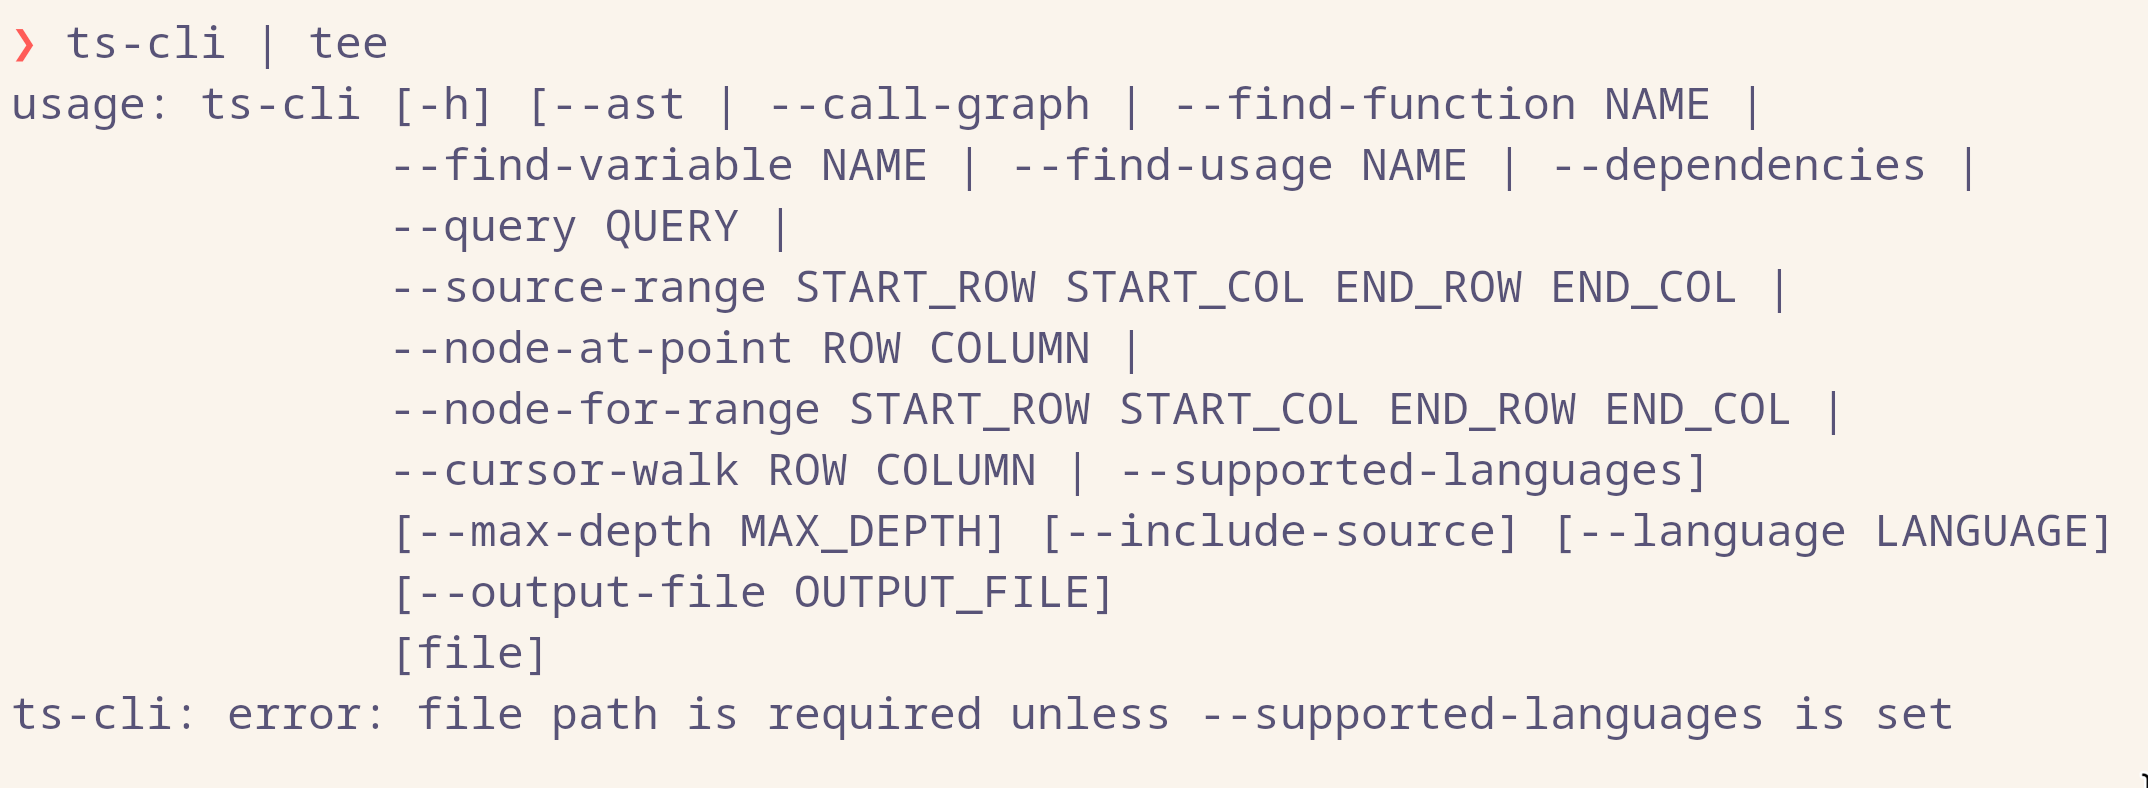
Now the agent can use the CLI tool as needed and will only load how to use it by calling --help.
This is a little hard for MCP servers that you did not write yourself but again, it is worth the ROI.
Philipp Schmid has released mcp-cli which does this for you!
2C. Design your MCP server
Instead of first taking an MCP server and then developing tooling around it to optimize it, you can just build your own MCP server over the API of that service.
This is really easy since most MCP providers also have an API and you can likely vibe engineer it in a few hours.
This blog post covers a great technique to design MCP servers.
3. Skills
In essence skills are just a formal way of writing instructions to a file and loading them as needed. This is crucial.
If your agent needs to do multiple things and do them well, putting everything in it’s system prompt is not going to help nor is making one subagent (discussed later) for every scenario. The instructions may be contradictory based on the existing context or useless if those scenarios are never encountered.
You can put these specific instructions for specific occasions into a different files and expose them as skills. Now, the agent should be intelligent enough to load these as needed and prevent context overload and confusion!
For the ts-cli tool we mentioned earlier, we know some specific agents in our multi-agent system needs to use it often, so we just expose it’s common usage techniques to it using a skill. So far, it has been greatly useful.
4. Purging context
It is very hard to know what part of the context window is actually useful and what is irrelevant.
One agreeable answer to this is that we can purge the outputs of the tool calls before, lets say, the last 30 tool calls.
The usefulness of this completely depends on the work your agent is doing. If it spends majority of it’s time finding code snippets, it wouldn’t hurt much because the calls will stay which contain filenames, etc. only the outputs will be purged.
You could also purge the the tool calls themselves, however, in that case, the agent will no longer know what files it has already operated on for example. Essentially it will lose track. Not what we want.
The other type of information that should not be purged is errors. This is hard to implement in practice because unless the system you’re working on is deterministic it is very hard to know what is an error and what is not.
For a Bash output you could look at the exit code (hypothetically) and employ such techniques. Personally we prefer not minding this too much.
However you can see some improvement if you can do this correctly as shown here by factoryai research.
5. Compaction
Even with all these optimizations, you will have to implement some form of compaction. Compaction or summarisation is when the whole context window is taken and summarized at a certain threshold (n tokens used, n% of context usage, etc.).
The context window will be rewritten as the summary. Tons of information is completely lost never to be recovered ever again!
If not done correctly compaction is pure doom for the agent. However, fear not. There are great techniques to battle this doom.
5A. Dual-Pass Summarisation
At a certain threshold, the whole context window is sent to an instance of the model with a summary prompt and then the output of the model is used to replace the whole context with the summary.
This is terrible as you can see. This is how we used to do it too and it would kill our agent’s ability to do useful work instantly.
One bottleneck here that can be optimized is the summary prompt itself.
In an ideal scenario you’d like it to be general enough to summarize any action it has done without losing information. For that, the summary prompt will also be general but that makes it vague and unspecific.
We can make it more specific and thus more useful by first using the conversation history to generate an ideal summary prompt and then using that prompt to do the summarisation.
Summarization triggered -> Pass the conversation history to the model with a prompt “Based on this history, generate a prompt to generate a summary…” (upto you) -> Use the summary prompt to do the summarization -> Replace the conversation history with the summary
There are gains to be achieved here and they can be noticeable if done well. However, one could argue that if the model instance is just prompted well, it can achieve similar or same performance.
There is unfortunately no data on this so the usefulness of this method is on you to decide.
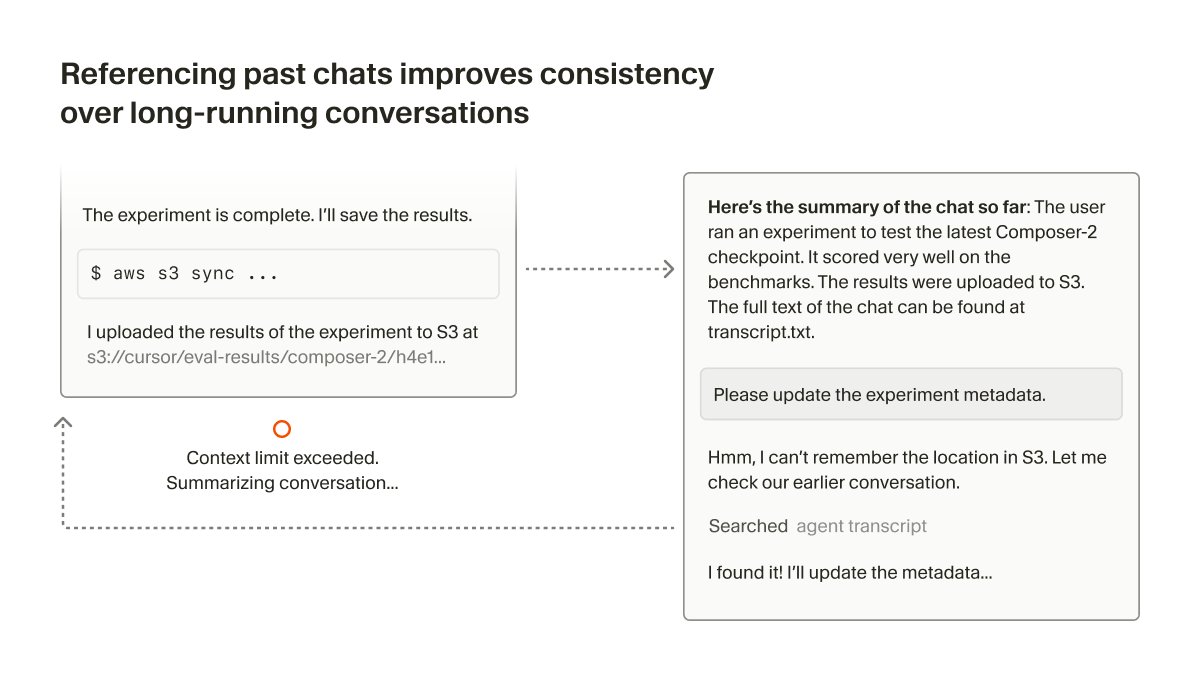
5B. Just-in-time conversation history
However good a summary is, it is still a summary. Information is still lost. It is a lossy form of compression. Again, this is not all doom as you shall see.
We can write the existing conversation history to a file and tell the agent to read it as it needed. If the summarisation job was well done, this would massively help the agent if the agent is prompted well about it or given a skill to learn this.
This is employed in our agentic systems and it seems to work well. This is originally from cursor’s research.
6. Subagents
Subagents are just agents which are specialized for some task and which can be called like tools by the primary agent. Having subagents allows the primary agent to offload tasks which require a specific type of expertise (much specific than what you could put in a skill) and directly get the result.
From the primary agent’s perspective, it is something like looking up the solutions on the back of a Math book as soon as it encounters a hard problem. The subagents does all the hardwork and prevents the context pollution of the primary agent.
You can have a subagent to explore the codebase, another to write tests, another to write documentation, etc. in an end-to-end development agentic workflow.
Conclusion
This is it, these were all the techniques that we have learned around context engineering. We’re sure we may have missed a few (please share them with us so we can cover them later) but these were the ones we had first hand experience with so we prioritized writing about them.
We wish to continue this series with more techniques!
References
- https://www.philschmid.de/context-engineering-part-2
- https://rlancemartin.github.io/2025/10/15/manus/
- https://blog.langchain.com/how-agents-can-use-filesystems-for-context-engineering/
- https://cursor.com/blog/semsearch?ref=blog.langchain.com
- https://www.anthropic.com/engineering/writing-tools-for-agents